Automatically Enabling the Application Classes


Automatically Enabling the Application Classes |
|
Automatically enabling application classes when performing a first installation1.Uncompress the BPM-Express-for-EMC-DiskArrays-<version>-PM2BPPM.zip file 2.Copy all the BBPM_SENTRYSOFTWARE-EMC-DISKARRAYS-SOLUTIONSEN_EMC_MAIN xml files into: <BPPM install dir>\ProactiveNet\pw\pronto\systdata\adapter-defaults 3.Restart the BMC ProactiveNet server
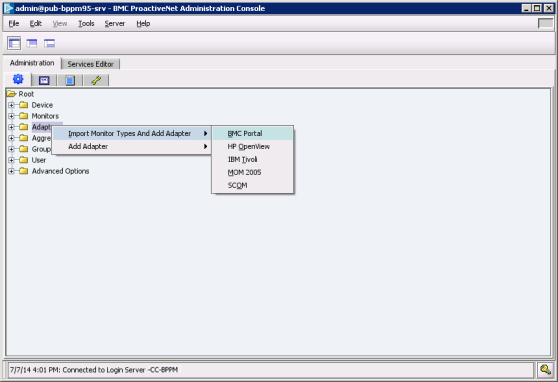
You will then have to create and import an adapter for a BMC Portal PM Automatically enabling application classes when performing an upgrade of a Performance Manager1.Uncompress the BPM-Express-for-EMC-DiskArrays-<version>-PM2BPPM.zip file in <BPPM install dir>\ProactiveNet\pw\pronto\systdata\adapter-defaults 2.Restart the BMC ProactiveNet server 3.Remove all previously installed EMC Disk Arrays Portal adapters from your BPPM environment: a.Open the BMC ProactiveNet Administration Console. Right-click the Adapters folder and select Import Monitor Types and Add Adapter > BMC Portal.
b.In the Configuration tab, set the connection parameters
•In the Instance Name field, enter a name for this instance of the Adapter that will perform the integration of the ‘targeted PM’ into BMC ProactiveNet. •Select the Agent where this instance of the Adapter will be executed •Enter the required information to connect to BMC Portal: BMC Portal Host Name or IP address, Port, BMC Portal User Name and Password •Enter the required information to connect to BMC Portal Datastore: BMC Portal Datastore Host Name or IP address, Port, and credentials c.Select only the EMC Performance Manager monitor d.Click Continue to validate the list of application classes to remove e.Click Next to validate the list of removed application classes f.Click Close to terminate the procedure without adding a new adapter You will then have to create and import an adapter for a BMC Portal PM See Also Creating and Importing an Adapter for a BMC Portal PM
|