|
The Web Request Monitor allows you to extract data from any Web-based interface. You can either monitor the availability of a Web page, extract useful information from a Web-based administration UI, or extract data from a Web service or a REST API. If your IT environment uses a proxy server, please make sure that the Proxy Settings are properly configured.
 Web Requests are always executed locally (on the PATROL Agent node). Web Requests are always executed locally (on the PATROL Agent node).
The Web Request Monitor enables you to configure the most common type of requests:
| • | GET that requests data from a specified resource. |
| • | POST, PUT and DELETE that submits data to be processed to a specified resource. |
Refer to the procedure corresponding to the type of Web request you wish to perform.
To perform a Web request (GET)
The GET method is commonly used to retrieve information from a given server using a specific URI. Requests using GET should only retrieve data and should have no other effect on the data.
The example illustrated in this section shows how to retrieve information about volumes on a EMC XtremIO server.
|
| 1. | In the PATROL Console, right-click the Host or Monitor Group icon and select KM Commands > New > Monitor... |
| 2. | Select Web Request from the drop-down list and click Next. |
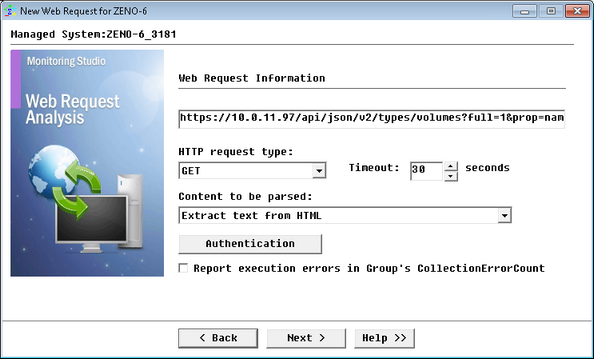
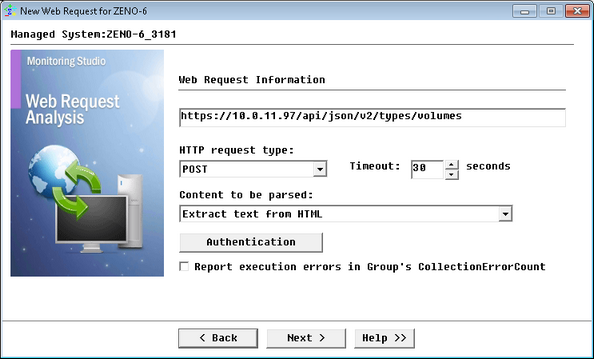
Performing Web Requests (GET) - Web Request Information
| • | Enter the URL of the resource that needs to be polled and monitored. It is possible to poll a secure web site by using the "https" method. |
| • | Select the GET request type. |
 Some Web forms can be passed to the server with the HTTP GET method. In this case, the form data goes through the URL (http://server/form.php?varA=valueA&varB=valueB&…). Some Web forms can be passed to the server with the HTTP GET method. In this case, the form data goes through the URL (http://server/form.php?varA=valueA&varB=valueB&…).
| • | Timeout: Specify the time in seconds after which the query will be stopped (Default: 30 seconds). If the request times out, the Status parameter will be set to 2 (Failed) and an alarm will be triggered. |
| • | Content to be parsed: Select the option corresponding to the information you want to retrieve from the Web page output returned by the Web server: |
| ▪ | Entire HTTP response - header + body |
| ▪ | Extract text from HTML (Default) |
| ▪ | Conversion of JSON to flat map |
The current example polls the URL of an EMC XtremIO server using a GET request type. The "Extract Text from HTML" option is used to retrieve the required volume information.
|
| 3. | (Optional) Click the Authentication button to configure the proxy settings. |
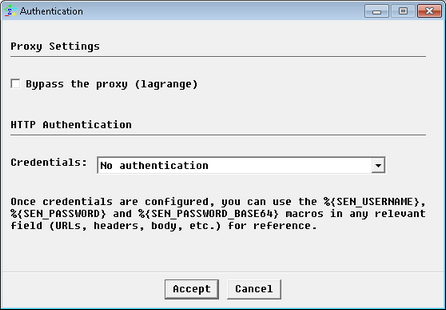
Performing Web Requests - Proxy Settings
| • | Bypass the proxy: Check this option if you have configured Proxy Settings and wish to bypass the proxy for this Web Request specifically. This can be useful when the resource is located on the internal network and the proxy refuses to serve it. |
| • | HTTP Authentication: Select the method you want to use to provide the credentials for HTTP authentication: |
| ▪ | No authentication: The Web Request does not require any authentication (Default). |
| ▪ | System Credentials: Uses the system credentials previously specified when creating the Host. |
| ▪ | Add new credentials: Lets you set new specific credentials. |
The current example uses the default option No Authentication; the authentication credentials will be provided through a header.
|
Refer to the HTTP authentication section on for more details.
| 4. | Click Accept to save your changes. |
| • | Report execution errors in Group's CollectionErrorCount: Select this option to have the CollectionErrorCount parameter of the group reflect possible alerts triggered upon the Web Request execution. The CollectionErrorCount parameter of the Group reports on the collection errors of any Monitor associated to the Group, for which this option is available and selected, providing a global view of the collection errors for the whole Group. |
| 5. | Click Next to continue. |
| 6. | (Optional) Specify Request Headers, that is Key (name) and Value pairs that are displayed in the request and response of message headers for Hypertext Transfer Protocol (HTTP). HTTP headers are an integral part of HTTP requests and responses and are mainly intended for the communication between the server and client in both directions. |
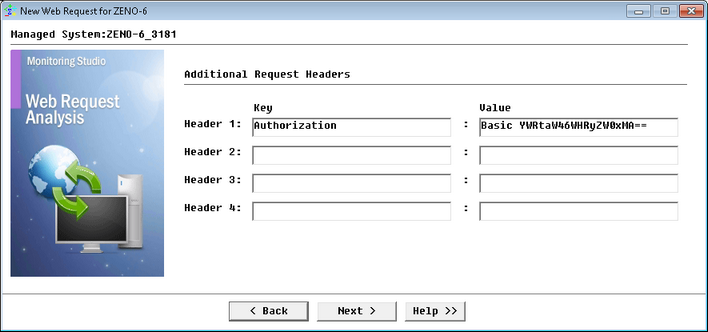
Performing Web Requests (GET) - Request Headers
The current example uses a basic authentication header specific to EMC XtremIO REST API.
|
| 7. | Click Next to continue. |
| 9. | Click Finish. The corresponding Web Request instance (Web Request: <Display Name>) is created in the PATROL Console. The collected parameters for Web Request instances are listed in the SEN_MS_WEBREQUEST chapter. |
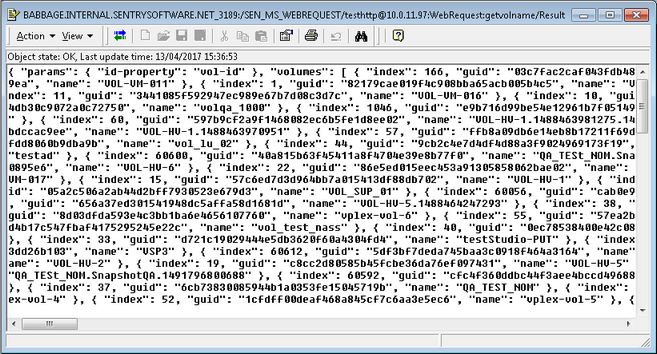
| 10. | Click the Result parameter to display the output of the request. |
The current example shows a list of all the volumes retrieved from the target server.
|
Performing Web Requests (GET) - Request Headers
Web Request (GET) output is displayed as list that might be difficult to read or extract valuable information. Use the Text Pre-processing tool to format the result output of your request.
To perform a Web request (POST, PUT, DELETE)
The example illustrated in this section shows a POST request performed on an XtremIO server to modify the size of a specific volume.
|
| 1. | In the PATROL Console, right-click the Host or Monitor Group icon and select KM Commands > New > Monitor... |
| 2. | Select Web Request from the drop-down list and click Next. |
Performing Web Requests - Web Request Information
| • | Enter the URI of the resource that needs to be polled and monitored. It is possible to poll a secure web site by using the "https" method. |
| • | Select a Request Type, such as POST in the current example: |
| ▪ | POST: A POST request is used to send data to the server: customer information, file upload, or volumes as in the current example, etc. using HTML forms. |
| ▪ | PUT: Replaces all the current representations of the target resource with the uploaded content. |
| ▪ | DELETE: Removes all the current representations of the target resource given by URI. |
| • | Timeout : Specify the time in seconds after which the query will be stopped (Default: 30 seconds). If the request times out, the Status parameter will be set to 2 (Failed) and an alarm will be triggered. |
| • | Content to be parsed: Select the option corresponding to the information you want to retrieve from the Web page output returned by the Web server. |
The current example polls the URL of an EMC XtremIO server using a GET request type. The "Extract Text from HTML" option is used to retrieve the information about volumes for which a specific parameter (size) will be modified by a request body (step 8).
|
| • | Entire HTTP response - header + body |
| • | Extract text from HTML (Default) |
| ▪ | Conversion of JSON to flat map |
| • | Click the Authentication button to configure the proxy settings. |
Performing Web Requests - Proxy Settings
| ▪ | Bypass the proxy: Check this option if you have configured Proxy Settings and wish to bypass the proxy for this Web Request specifically. This can be useful when the resource is located on the internal network and the proxy refuses to serve it. |
| ▪ | HTTP Authentication: Select how you want to enter the credentials for HTTP authentication. |
The current example uses the default option No Authentication; the authentication credentials will be provided through a header.
|
| • | No authentication: The Web Request does not require any authentication. |
| • | System Credentials: Uses the system credentials previously specified when creating the Host. |
| • | Add new credentials: Lets you set new specific credentials. |
Refer to the HTTP authentication section on for more details.
| 3. | Click Accept to save your changes. |
To post a form to a Web server, you need to enter the URL of the script/CGI/page that will actually process the data, which may be different from the Web page URL that shows the form itself. Again, you need to check the Web form HTML source to identify the URL to query.
A Web form HTML source should contain a statement like the following one: <FORM METHOD="POST" ACTION="/urlToQuery.php">.
| • | Report execution errors in Group's CollectionErrorCount: Select this option to have the CollectionErrorCount parameter of the group reflect possible alerts triggered upon the Web Request execution. The CollectionErrorCount parameter of the Group reports on the collection errors of any Monitor associated to the Group, for which this option is available and selected, providing a global view of the collection errors for the whole Group. |
| 4. | Click Next to continue. |
| 5. | (Optional) Specify Request Headers, that is Key (name) and Value pairs that are displayed in the request and response of message headers for Hypertext Transfer Protocol (HTTP). HTTP headers are an integral part of HTTP requests and responses and are mainly intended for the communication between the server and client in both directions. |
The current example uses a basic authentication header specific to EMC XtremIO REST API.
|
Performing Web Requests - Request Headers
| 6. | Click Next to continue. |
| 7. | Configure Request Body Type Settings: |
Provide the required information according to the type of Request Body you have selected:
A - Request Body (None)
No additional information is needed. Simply click Next to Configure the Monitor settings
B - Request Body (Form)
Configure the required settings:
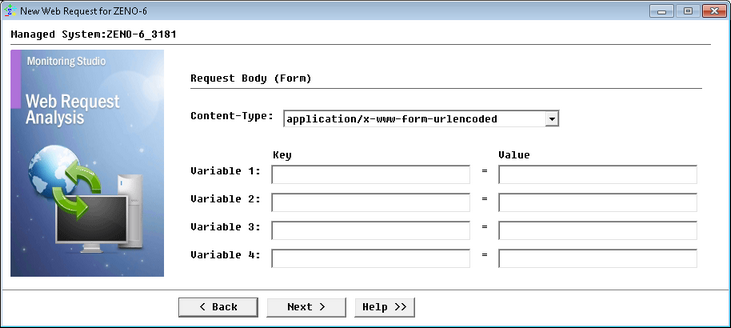
Performing Web Requests - Request Body (Form) Settings
| ▪ | Content-Type: Select the option corresponding to the type of content for the request: |
| o | use multipart/form-data to transmit binary (non-alphanumeric) data |
| o | use application/x-www-form-urlencoded otherwise (Default). |
| ▪ | Variables: Provide the Variables' Key (name) and Value pairs that compose your query. |
C - Request Body (Free)
Configure the required settings:
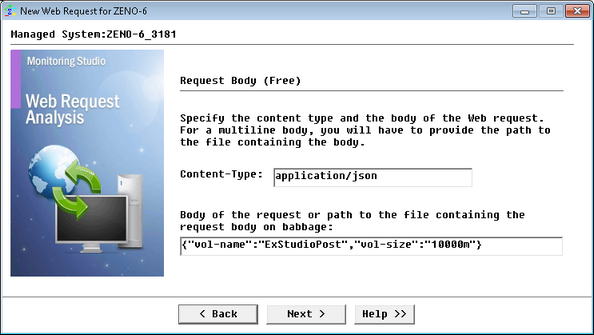
Performing Web Requests - Request Body (Free) Settings
| ▪ | Content-Type: Select the option corresponding to the type of content for the request. |
The current example uses the application/json body content-type that provides the name of the target volume and the parameter to modify in JSON format. In this case the size will be set to 10000m.
|
| ▪ | Provide the Body of the request (single line) or the path to the file containing the request Body (on the PATROL Agent) if the body contains multiple lines. The file path can include environment variables. If a file is provided, the Monitoring Studio discovery will read the file on the localhost and use its content as the request body. |
| 8. | Click Finish. The corresponding Web Request instance (Web Request: <Display Name>) is created in the PATROL Console. The collected parameters for Web Request instances are listed in the SEN_MS_WEBREQUEST chapter. |
| 9. | Click the Result parameter to display the output of the request. |
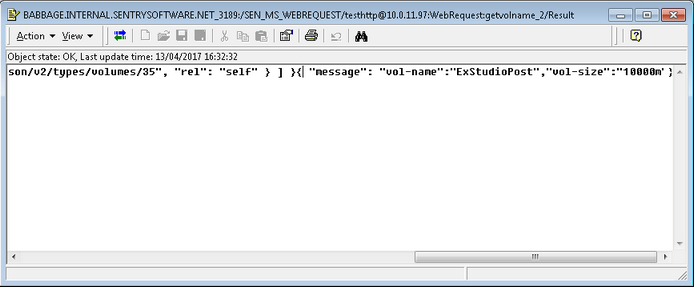
Performing Web Requests - Request Body (Free) Settings
For Web Request (DELETE), a value set to 200 in the graph of the HTTPStatusCode parameter, indicates that the query has been performed successfully. The Result parameter will show 'No Data'. If the query fails, the graph of the HTTPStatusCode parameter will display a value of 400.
| 

