-
Home
- PATROL
Troubleshoot Veritas NetBackup KM
This section describes the basic troubleshooting steps to follow before contacting Customer Support and lists the most common issues.
Performing the First Troubleshooting Steps
If you encounter issues while using Veritas NetBackup KM for PATROL, please complete the following steps:
- Look for error messages in the PATROL Console System Output Window (SOW) or in the KM log file
<PATROL_HOME>/log/NBU_<port>.log. - Check the KM Status Report by selecting the menu KM Status from the Server icon or from the file
<PATROL_HOME>/lib/NBU/tmp/km_status_<node-id>_<agent-port>.txt. - Look for relevant PEM events. They include an Expert Advice, which provides details about the problem and some suggestions to resolve it.
- Verify that the latest version of the Veritas NetBackup KM is installed on the PATROL Agent system.
- Search the Sentry Software's knowledge base for solutions for this specific issue.
Most Common Issues
Install/Upgrade Issues
KM Behavior is Unchanged After Upgrade
Check the version of the KM from the main Infobox. If it has not changed, then the installation is not complete. Make sure both the PATROL Console and the PATROL Agent are uninstalled and installed correctly during the KM upgrade
Veritas NetBackup Icon Missing After Loading
- Check that the KM is loaded using NBU_LOAD.kml and that NBU_MAIN is loaded.
- Check that there is no KM version mismatch between the PATROL Console and the PATROL Agent. Check the messages in the SOW to verify this.
- Check whether the PATROL Agent user has necessary privileges added in the Agent’s Access Control List (
/AgentSetup/accessControlList) in order to read and write to the Agent Configuration Database.
Unable to Find NBU_LOAD.kml
- Check that the Load KM browser is looking for
*.kmlfiles under<PATROL_HOME>/lib/knowledgefolder. - Veritas NetBackup KM files have not been installed correctly under the PATROL installation directory on the PATROL Console.
Display/Refresh Issues
KM Application Instances Do Not Appear
- Check that the KM instance limits have not been exceeded. Look for error messages in the SOW, and increase the instance limits for affected objects using the menu Configuration > Instance Limits….
- Check whether the server icon is in offline state. None of the data collectors will be executed until the server is enabled and online.
- If the KM is configured for multi-node mode monitoring, some components are not monitored on the passive cluster node.
KM Configuration Menus are Disabled
By default, the Veritas NetBackup KM runs in Central Monitoring Administration Mode (CMA Mode), allowing the configuration to be received from BMC Helix/TrueSight Operations Manager CMA policy. Check that the KM is setup to run in Classic Mode.
KM Objects Disappear from the Console
- Check whether there is a KM version mismatch between the PATROL Console and the PATROL Agent, possibly after an improper upgrade of the KM. Check the messages in the SOW to verify this.
- Check that the Veritas NetBackup KM login details are still valid. Has the password changed on the system? Look for error messages in the SOW, and check for additional information in the last annotation point for parameter NBULoginStatus.
Old Active Jobs are not Removed
By default, all active jobs are monitored, and they are exempted from ageing. It is possible to change this behavior by Including Active Jobs in the menu Configuration > Jobs from Jobs container.
Old Acknowledged Jobs Kept in pconfig
By default, the KM stores all acknowledged jobs. Use the following PSL through PATROL Console to keep only the last <number> of jobs on <node-id>:
%PSL pconfig("REPLACE", "/Runtime/NBU/<node-id>/NBU_JOB/jobAcknowledgementCapacity", <number>);
Replace <node-id> with the appropriate node ID of the NetBackup server and restart the PATROL Agent. Leave the <node-id> empty for localhost monitoring.
Performance Issues
CPU and Memory Usage is too High
CPU and memory usage will depend on the size and complexity of your environment and your Veritas NetBackup KM configuration. As you increase data collection frequency, increase the number of servers and components monitored by the KM, your CPU and memory usage will increase.
When monitoring a standard local installation of Veritas NetBackup using Veritas NetBackup KM, the PATROL Agent will consume between 5MBytes and 10MBytes of additional system memory. An enterprise installation of Veritas NetBackup Master Server with multiple Media Servers, Clients, Storage Servers and Storage Units can consume more memory (as per other KMs used by the PATROL Agent). The memory usage of Veritas NetBackup KM can be reduced by:
- disabling monitoring unnecessary component instances
- disabling unwanted components by setting their instance limits to 0 (zero)
- disabling unwanted collectors by using the PATROL Configuration Manager
- increasing the collector scheduling interval by using the PATROL Configuration Manager
- decreasing the instance limits to limit the number of instances created by the collectors
The data collectors in Veritas NetBackup KM use Veritas NetBackup command line interface to obtain Veritas NetBackup information. Most of the performance degradation is associated with these command executions and the amount of data returned. It may improve the overall performance if the regular housekeeping is followed on all Veritas NetBackup systems.
Network Traffic
When monitoring a NetBackup server through a local PATROL Agent, Veritas NetBackup KM generates minimal network traffic. Most of the data is kept on the managed node. The amount of network traffic that it generates depends on the number of PATROL Consoles that are connected to the PATROL Agent and the frequency of data collection.
When monitoring remote NetBackup servers, some network traffic will be observed as it transfers the commands result over the network. The traffic depends on the amount of data polled during each command execution. When commands are expected to return large output, the KM is designed to use file transfers through SFTP (on UNIX/Linux) and Windows file shares (on Windows).
Parameters and Application Classes Refresh Takes too Long
Data collectors run according to their scheduling interval (polling cycle) defined in the KM. These intervals are defined for a standard environment with minimal resource impact; They can be customized from the PATROL Developer Console or PCM to suit your environment. Refer to the PATROL Console User Guide for more details.
Poor Performance of the Master/Media Server
The performance of the Master/Media Server may change after installing Veritas NetBackup KM on a heavily used system. Depending on the complexity of your Veritas NetBackup environment, the KM may consume more resources to interrogate the application and process the data. In such a complex environment, the Veritas NetBackup KM may require some fine-tuning to optimize the available resources. Consider the following options:
-
Disable the monitoring of unnecessary application instances. Refer to the section Filtering Elements to Monitor for more details.
-
Increase the scheduling interval (polling cycle) for data collectors.
-
Deactivate monitoring non-critical components by setting the Instance Limits to 0 (zero).
-
Deactivate unnecessary data collectors during selected time intervals, where there is no Veritas NetBackup activity. For example, if the job monitoring can be disabled between 9 am and 4 pm every day, except weekends, then disable the job data collector (NBUJobCollector) during this period by running the following PSL through the PATROL Console:
%PSL pconfig("REPLACE","/Runtime/NBU/<node-id>/NBUJobCollectorMode", "0|32400|57600|0|0|||||||||||0|0");Here the pconfig variable is named as:
<collector name>Mode. Replace<node-id>with the appropriate node ID of the NetBackup server. Leave the<node-id>empty for localhost monitoring. The value contains the following details, delimited by a pipe (|):enabled (1)/disabled (0) data collection, default start/end times in a number of seconds since midnight, start/end times for non-default days starting from Sunday through to Saturday. Restart the PATROL Agent after the change. -
Defining a “no command execution window” for all collectors will pause running commands at peak times or during NetBackup maintenance windows. This can be set using the PSL below. Replace
<node-id>with the appropriate node ID of the NetBackup server and restart the PATROL Agent:%PSL pconfig("REPLACE", "/Runtime/NBU/<node-id>/noExecuteWindow", "23:59:00|120");The value of this configuration variable is in format
<start time in HH:MM:SS 24-hour clock>|<duration in seconds>. The above23:59:00|120sets all collectors to sleep between 23:59:00 and 00:01:00 (2 minutes) every day before executing commands. Also, thisnoExecutewindowsupports multiple time windows:%PSL pconfig("REPLACE", "/Runtime/NBU/<node-id>/noExecuteWindow",["23:59:00|120","11:59:00|120"]); -
Purge unnecessary information in Veritas NetBackup catalog databases and log files.
-
If there are too many clients configured in Veritas NetBackup, the NBUClientCollector and NBUPolicyCollector may affect the overall performance. In such an environment, disable the NBUClientCollector, or set their instance limits to 0 (zero), using menu Configuration > Instance Limits.
-
Refer to the Infinite Loop Errors section below for a possible PATROL internal scheduling delay that may impact the performance of the KM.
Infinite Loop Errors
If error messages in the SOW report that some Veritas NetBackup KM data collectors may be in an infinite loop, check the setting of the tuning variable /AgentSetup/AgentTuning/pslInstructionMax.
PATROL Agent uses the pre-configured tuning variable (/AgentSetup/AgentTuning/pslInstructionMax) to stop running PSL functions in an infinite loop. When a PSL function reaches this maximum threshold, it reports this error and puts its execution to the back of the process queue. This will not only delay the data collector but also impact the performance of the system.
To resolve this situation, the maximum number of instructions should be increased to an optimum value depending on the complexity of your environment. It is required that the default value of 500,000 should be increased to at least 5,000,000 on a standard Veritas NetBackup environment to enable the Veritas NetBackup KM data collectors to execute without impacting your system.
If this still does not resolve the problem, you can disable this functionality by setting the value of the tuning variable to 0 (zero).
NBULoginStatus in Suspicious (Warning) Status
This parameter will show a “suspicious” state if any command executed by Veritas NetBackup KM fails.
- Check the annotation point on this parameter's first state change data point to look for failing commands. If an annotation point cannot be found or is not up-to-date, check the KM Status Report in the menu KM Status of the server icon. These errors are produced from the Veritas NetBackup commands executed by the Veritas NetBackup KM.
- Check that the operating system user configured in the menu Configuration > Login can execute all NetBackup commands and access the NetBackup files.
Blocking Remote Monitoring
The server owner/administrator may want to stop the monitoring of a remote Veritas NetBackup server when performing maintenance work on this server. The monitoring can be blocked from the relevant NetBackup server and will not require making any change from the monitoring PATROL Agent system(s). To do so, the administrator has to create a file named NBU_block under the Remote Temp Directory Path. By default, this path is set to /var/tmp (on UNIX/Linux) or C:\Windows\Temp (on Windows).
All PATROL Agents monitoring this NetBackup server will detect the block file during the next discovery cycle and turn the node instance to NetBackup Setup (Monitoring Blocked).
To resume the monitoring:
- for all PATROL Agents, delete the NBU_block file.
- for a specific PATROL Agent, create under the Remote Temp Directory Path a file named NBU_unblock_<agent-host-id>, where <agent-host-id> is to be replaced with the PATROL Agent hostname.
Contacting Customer Support
If none of the above steps resolve the issue, please register a case for assistance. Before contacting our Customer Support, make sure that you have the following information available:
KM Status Report
Generate the KM Status Report by selecting the menu KM Status from the server instance or the NetBackup Setup icon. This report lists most KM problems and product information. The same report can be accessed from the file <PATROL_HOME>/lib/NBU/tmp/km_status_<node-id>_<agent-port>.txt on the PATROL Agent system.
KM Debug
When you encounter an issue and wish to report it to Sentry Software, you will be asked to enable the Debug Mode and provide the debug output to the Sentry Software support team.
Enabling the Debug Mode
-
In the Console, right-click the server instance > KM Commands > Configuration > Debug… The NetBackup KM Debug Configuration dialog is displayed:
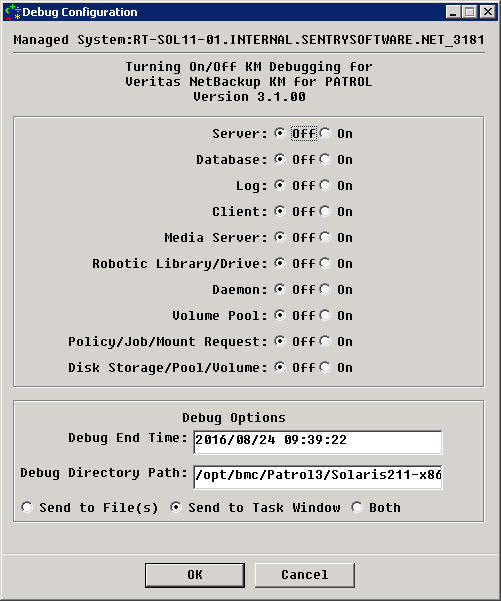
-
Select On for the debug switch(es) you want to enable. Refer to the table below to know the application classes and collector parameters included in the debug switch:
Object Debug Switch Application Classes Collector Parameters Server NBU_MAIN, NBU_SERVER NBUCreateDistribution Database NBU_DATABASE_CONTAINER, NBU_DATABASE NBUDatabaseCollector Log NBU_LOG_CONTAINER, NBU_LOG NBULogCollector Client NBU_CLIENT_CONTAINER, NBU_CLIENT NBUClientCollector Media Server NBU_MEDIASERVER_CONTAINER, NBU_MEDIASERVER NBUMediaServerCollector Robotic Library/Drive NBU_LIBRARY_CONTAINER, NBU_LIBRARY, NBU_LDEVICE,
NBU_DEVICE_CONTAINER, NBU_DEVICENBULibraryCollector,
NBUDriveCollectorDaemon NBU_DAEMON_CONTAINER, NBU_DAEMON NBUDaemonCollector Volume Pool NBU_POOL_CONTAINER, NBU_POOL NBUPoolCollector Policy/Job/Mount Request NBU_POLICY_CONTAINER, NBU_POLICY, NBU_PCLIENT,
NBU_JOB_CONTAINER, NBU_JOB,
NBU_MOUNT_CONTAINER, NBU_MOUNTNBUPolicyCollector,
NBUJobCollector,
NBURequestCollectorDisk Storage/Pool/Volume NBU_STORAGE_CONTAINER, NBU_STORAGE,
NBU_DPOOL, NBU_DVOLUMENBUStorageCollector -
Set the Debug Options:
- In the Debug End Time field, indicate the date and time after which debug information will no longer be logged.
- In the Debug Path field, indicate where the debug file will be stored (by default:
<PATROL_HOME>/logon UNIX/Linux systems;%PATROL_HOME%\logon Microsoft Windows systems). The debug folder must have at least 10MB of available disk space and read, write and execute permissions for both the PATROL Agent user and the Veritas NetBackup KM login user - Select Send to File(s) to write all debug messages to files under the Debug Path.
- Select Send to Task Window to view the debug messages as they occur in a task window on the PATROL Console, labeled NBU Debug Output for <node-id>. Before selecting this option, make sure the PATROL Console is connected to the PATROL Agent.
- Select Both (Recommended) to send the debug messages both to files and task window.
-
Click OK first to start Veritas NetBackup KM debugging
-
Click Yes to reload the KM and capture debug from the initial collection cycle.

If you cannot turn on the KM Debug following the method described above, you can do so by setting the appropriate PATROL Agent configuration variable with a timestamp value. This timestamp value determines when the debug should be turned off. For example, to turn on the debug for 60 minutes from now, run the following PSL through PATROL Console:
%PSL pconfig("REPLACE","/Runtime/NBU/<node-id>/<component>Debug",time()+3600);
Where <component> is either server for debugging the server discovery or name of the collector component in lower case followed by “Collector”, like daemonCollector for debugging daemon collector. Replace <node-id> with the appropriate node ID of the remote NetBackup server. For a local host, remove <node-id>.
Disabling the Debug Mode
The debug switches will be turned off automatically when the debug end time is reached. A tar/zip file is then automatically created under <PATROL_HOME>/lib/NBU/ and can be sent to the Sentry Software Support for help. It is also recommended to check the SOW or NBU_<port>.log file, stored in <PATROL_HOME>/log, for any error.
To manually stop debugging:
- Access the NetBackup KM Debug Configuration dialog
- Select Off for the debug switch(es) you want to disable
- Click OK.
Preparing the Debug Files for Sending to Sentry Software
If you choose to only send the output to a task window, you can save the debug output as follows:
- Right-click in the NBU KM Debug Output for <node-id> window.
- Select Save As and specify a location to save data.
If you choose to send debug information to file(s), you will be asked to prepare the debug files for sending to Sentry Software:
-
Click Yes to compress the files into a:
nbu_km_debug_<node-id>_<date>_<time>.tarfile (UNIX/Linux systems). This file could later be found in$PATROL_HOME/log/nbu_km_debug_<node-id>_<date>_<time>.zipfile (Windows systems). This file could later be found in%PATROL_HOME%\log\
-
Click No if you do not want to compress the files. You will then be asked if you want to retain or delete them.
If the compressed file is not created successfully, you can create it manually by including all files and sub-directories under $PATROL_HOME/log/ (on UNIX/Linux) or %PATROL_HOME%\log\ (on Microsoft Windows).
Appending Output Data to Existing Files
If you want to gather output from several debug sessions:
- Disable the debug mode
- Click No when asked to prepare the files for sending
- Choose to Retain the debug files
- Start the next debug session
- Choose to append the output data to existing files.