-
Home
- PATROL
Operate Veritas NetBackup KM
This section describes the most common operations that can be performed with Veritas NetBackup KM.
Acknowledging Alerts
By default, alerts are acknowledged automatically. If you modified the alert acknowledgement default settings, you will have to manually acknowledge alerts.
Manually Acknowledging Job Alerts
For a particular job instance, if the NBUJobStatus has a value of 1=Suspicious or 2=Failure, it will be set to alert with a status of Warning or Alarm respectively. These alerts can be acknowledged using the menu Acknowledgement > Alert… from the relevant job instance.
To acknowledge job alerts:
-
In the Console, right-click the Jobs instance > KM Commands > Acknowledgement
-
Select:
- Warnings… to view and acknowledge alerts for all jobs with a status of Warning
- Alarms… to view and acknowledge alerts for all jobs with a status of Alarm
- All… to view and acknowledge all job alerts (Warnings and Alarms) at once.
Manually Acknowledging Log Alerts
When an error is detected in a monitored log file, it will either appear in NBULogAlarmText or NBULogWarningText and will respectively trigger an Alarm or a Warning on NBULogAlarmCount or NBULogWarningCount.
To acknowledge log alerts:
-
In the Console, right-click the Log instance > KM Commands > Acknowledgement
-
Select:
- Warnings… to view, select, and individually acknowledge errors in the NBULogWarningText parameter
- Alarms… to view, select, and individually acknowledge errors in the NBULogAlarmText parameter
- All… to acknowledge all alerts (Warnings and Alarms) at once without viewing.
Generating Reports
The following reports are available in Veritas NetBackup KM:
- Daemons > Reports > Daemon List…: lists all running Veritas NetBackup daemons
- Databases > Reports > Database Backup Information…: reports information about the last catalog database backup
- Logs > Reports > Messages List…: reports all messages logged in the past 24 hours
- Mount Requests > Reports > Pending Requests…: reports a list of all mount requests
- Policy instance > Reports > Policy Schedule…: displays the schedule for the selected policy instance
- Robotic Libraries > Reports > Drive Cleaning Statistics or Standalone Drives > Reports > Drive Cleaning Statistics…: reports the drive cleaning statistics on the current master/media server
- Robotic Library instance > Reports > Robotic Library Contents…: reports the contents of the selected robotic library instance
- Volume Pools > Reports > Available Media…: reports all available media across all volume pools.
- Volume Pool instance > Reports > Media List…: reports information on all media in the selected volume pool instance
Reports can be saved as a task window by clicking Save As Task. You could then save them as a text file or print them.
Refreshing Parameters
This section describes how to manually refresh parameters without waiting for an automatic polling cycle.
Forcing All Discoveries
To force all discoveries, right-click the Server instance and select:
- Refresh Process Cache to refresh the PATROL Agent process cache
- Force Discovery.
The discovery will then be forced on all the KMs loaded on the PATROL Agent and on all the KM applications classes.
Forcing All Data Collectors
To force all data collectors, right-click the Server instance and select:
- Refresh Process Cache to refresh the PATROL Agent process cache
- Refresh parameters to force all data collectors at the same time.
The Veritas NetBackup KM data collectors and all the data collectors defined under the application classes loaded on the PATROL Agent will then be refreshed.
Forcing Selected Data Collectors
This option is only available from a PATROL Developer Console.
-
Right-click the Server instance and select Refresh Process Cache to refresh the PATROL Agent process cache
-
Force a data collector to execute immediately as follows:
With the PATROL Console for Windows
- Right-click the Server instance and choose Parameters without Icons…
- Select the required data collector
- Click Update.
With the PATROL Console for UNIX
- Right-click the Server instance and choose Customize > Parameters…
- Select the required data collector
- Click Options > Update.
With the PATROL Central Operator Console
- Right-click the Server instance and choose Properties
- Click the Parameter List tab
- Select the required data collector
- Click Update.
Forcing Full Data Collection for Jobs
By default, the NBUJobCollector only searches for new jobs started since the last collection cycle. However, it can be forced to search for all jobs within the monitored time period during the next collection cycle.
To force full data collection for jobs, right-click the Jobs instance and select Force Full Collection….
Forcing the Classic Mode
Veritas NetBackup KM for PATROL can either be configured from a BMC PATROL Console (Classic Mode) or BMC Helix/TrueSight Operations Management. When the KM is installed on a PATROL Agent, which is managed by Central Monitoring Administration (CMA), all the KM configuration menus are disabled in the PATROL Console. To configure Veritas NetBackup KM from a PATROL Console, you need to force the KM to run in Classic Mode.
This will disconnect Veritas NetBackup KM from receiving configuration from Central Monitoring Administration. Any monitoring settings that was configured in CMA and used by the PATROL Agent will be removed and replaced by the configuration made from the PATROL Console. However, this will not delete the policies created in CMA from the configuration.
Warning: Any configuration for Veritas NetBackup KM received from Central Monitoring Administration will be ignored.
To force the KM to operate in Classic mode:
-
In the PATROL Console, right-click the Veritas NetBackup icon > KM commands > Configuration > Force Classic Configuration Mode…
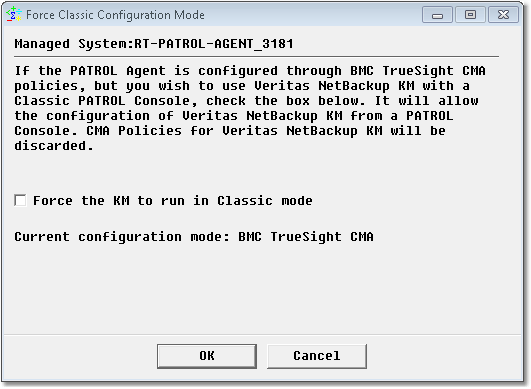
-
Check the Force the KM to run in Classic mode box and click OK.

Veritas NetBackup KM for PATROL starts running in Classic Mode, enabling you to use the KM Configuration menus.
To configure the KM in Helix/TrueSight OM, repeat the above procedure and uncheck Force the KM to run in Classic mode. All configurations made through the PATROL Console will then be ignored.
Reloading Commands
All new commands are reloaded automatically but some situations may require a manual command reload. To do so, in the Console, right-click the Server instance > KM Commands > Reload Commands…